Please see the Bell simple setup video from step 1. First, unplug the power cord from your current setup. Then, set up the products demoed in this video, which are the CBL for channel POA in BR and the CBL for the megapixel model resume. Next, remove your NVR from its packaging and connect the power cord. Plug the power cord into your NVR's power source. Once the unit is powered on, the indicator light and cord will turn on. Connect your NVR to your monitor using the HDMI cable. Your NVR should come with a mouse, so remove it from the package and connect it to the USB port. Next, unpack the camera, starting with the C bail four megapixel motorized one. Then, unpack the 2-megapixel fixed dome cameras and remove the caps from the POA ports on the cameras. Use Ethernet cables to connect the cameras' POA ports to the NVR's POA ports. Once all four cameras are connected, power on the NVR using the switch on the back. Once the device boots, you're ready to set up with the C Bell simple setup wizard. If you would like a more detailed wizard setup video, please click here. Enter your username and password, which by default is admin123456. Click Next. Choose your timezone and set your date and time format. Make sure the options "Obtain IP address automatically" and "Obtain DNS automatically" are checked. On the next screen, you will see your NVR's QR code, which is used in C Bell Mobile for easy device connections. Your cameras will be displayed, from POE1 to POE4. Click to add them all. In the disk setting screen, select "Format," then click OK and Next. Select "Record on motion," which is the recommended setting. Now, your camera can record on motion....
Award-winning PDF software


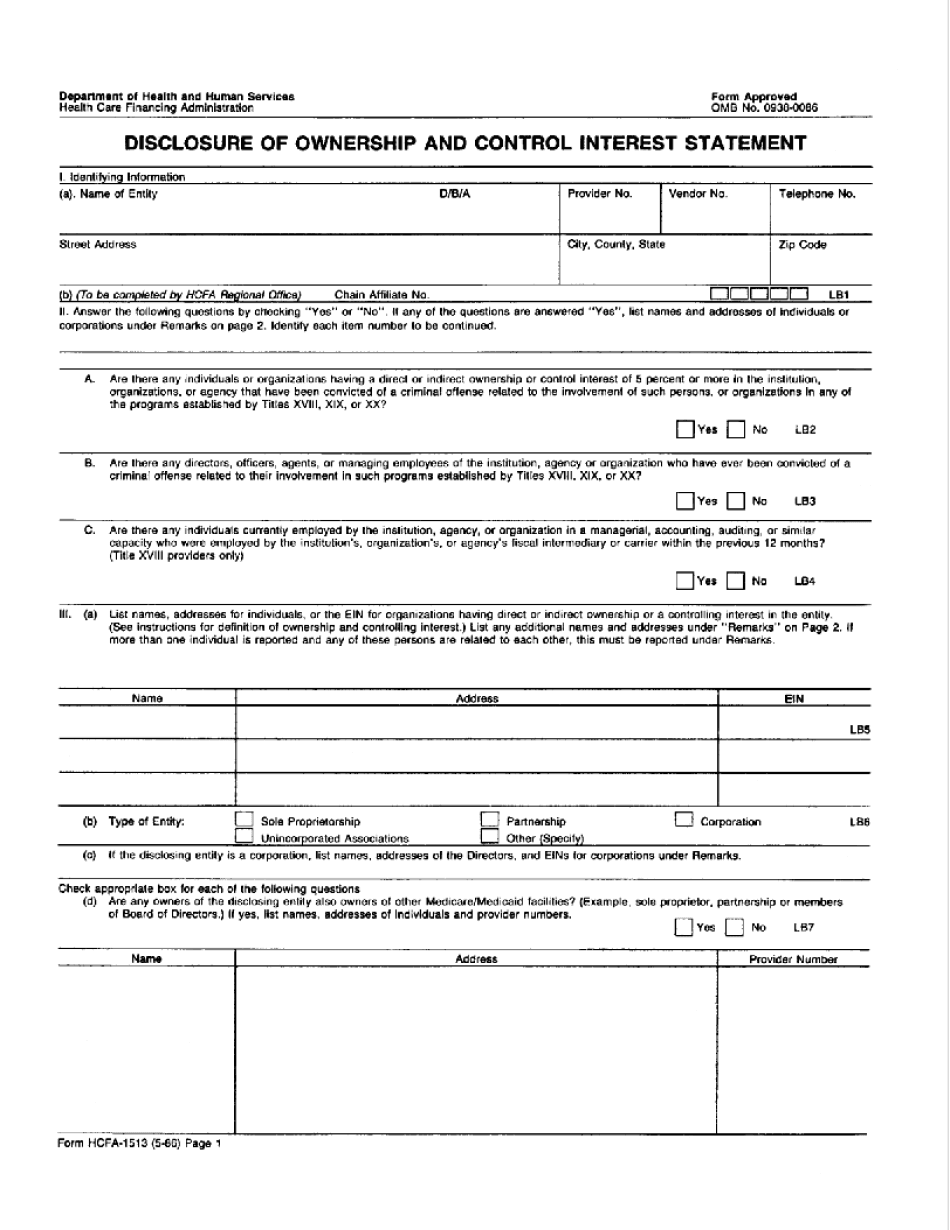
HCFa-1513 Form: What You Should Know
Yes No LB7. Name. Address. Proprietary Institution Number. Form HCFA-1513 (5-86) Page 2 DISCLOSURE OF OWNERSHIP AND CONTROL INTEREST (d) (To be completed by the CFA office) Chain Affiliate No. Yes No LB7. Name. Address. Provider Number. Form HCFA-1513 (5-86) Page 3 Disclosure of Ownership and Control Interest Statement. ADDRESS. PROVIDER NUMBER/CIA Number. Yes. No. LAB. 1513 (7/07) (e) (To be completed by the CFA office) Chain Affiliate No. Yes. No LB7. Name. Address. Provider Number. Form HCFA-1513 (5-86) Page 4 DISCLOSURE OF OWNERSHIP AND CONTROL INTEREST. (f) (To be completed by the CFA office) Chain Affiliate No. Yes No LB7. Name. Address. Provider Number. Form HCFA-1513 (5-86) Page 5 DISCLOSURE OF OWNERSHIP AND CONTROL INTEREST (F) (1) (To be completed by the CFA office) Chain Affiliate No. Yes. No LB7. Name. Address. Provider Number. Form HCFA-1513 (5-86) Page 6 (2) (To be completed by the CFA office) (a) (To be completed by the CFA office) Chain Affiliate No. Yes. No LB7. Name. Address. Provider Number. Form HCFA-1513 (5-86) Page 7 (b) (To be completed by the CFA office) Chain Affiliate No. Yes. No LB7. Name. Address. Provider Number. Form HCFA-1513 (5-86) Page 8 DISCLOSURE OF OWNERSHIP AND CONTROL INTEREST (3) (To be completed by the CFA office) Chain Affiliate No. Yes. No LB7. Name. Address. Provider Number. Form HCFA-1513 (5-86) Page 9 (4) (To be completed by the CFA office) Chain Affiliate No. Yes. No LB7. Name. Address. Provider Number.
online solutions help you to manage your record administration along with raise the efficiency of the workflows. Stick to the fast guide to do HCFa-1513, steer clear of blunders along with furnish it in a timely manner:
How to complete any HCFa-1513 online: - On the site with all the document, click on Begin immediately along with complete for the editor.
- Use your indications to submit established track record areas.
- Add your own info and speak to data.
- Make sure that you enter correct details and numbers throughout suitable areas.
- Very carefully confirm the content of the form as well as grammar along with punctuational.
- Navigate to Support area when you have questions or perhaps handle our assistance team.
- Place an electronic digital unique in your HCFa-1513 by using Sign Device.
- After the form is fully gone, media Completed.
- Deliver the particular prepared document by way of electronic mail or facsimile, art print it out or perhaps reduce the gadget.
PDF editor permits you to help make changes to your HCFa-1513 from the internet connected gadget, personalize it based on your requirements, indicator this in electronic format and also disperse differently.
Video instructions and help with filling out and completing HCFa-1513